In this guide, we will cover how you can create the hardware and software for an Arduino LED rave mask. Feel free to refer to the GitHub repository for this Arduino project.
The mask looks much better in person but here is the end result:
ARDUINO NANO: ~$3-$5 - Used to control the LEDs
2 x 1 METER 144LEDS/M WS2182B NON-WATERPROOF: ~$40-$60 - 144 LEDs/m is a lot of pixels, so 60 LEDS/m could work as well and is far cheaper and easier to solder. Waterproof versions can be harder to hold in place in the mask.
3 x BATTERY PACK: $1-$5 - You can use a 4 pack ONLY if you use 1.2V NiMH rechargeable batteries. Your NeoPixels will break if you use 4 normal 1.5V batteries.
3 x AA 1.5V BATTERIES: $2 - You can use 1.2V NiMH rechargeable batteries as long as you stay below 5V and high enough to show colors properly.
SILICON WIRES: ~$10-$15 - Needed to connect the LEDs together. Jumper cables won't work in this project.
MASK: ~$12 - Any airsoft mesh mask should work.
USB A TO MINI B CABLE: ~$5 - Arduino Nanos use a cable different from the Uno
HEATSHRINK: ~$2 - Keeps your wires and solders clean and secure.
Arduino Uno Case / Project Box: ~$2-~$4 - Can be 3d printed as well, but should fit your battery pack and Arduino Nano.
470 OHM RESISTOR: Helps keep the signal to the NeoPixels clear
If you don't have one already, you will need a soldering iron and solder wire. Be sure to be extra safe when soldering and not breathe the smoke by taking proper precautions. Soldering is difficult, be sure to look up guides on how to solder properly.
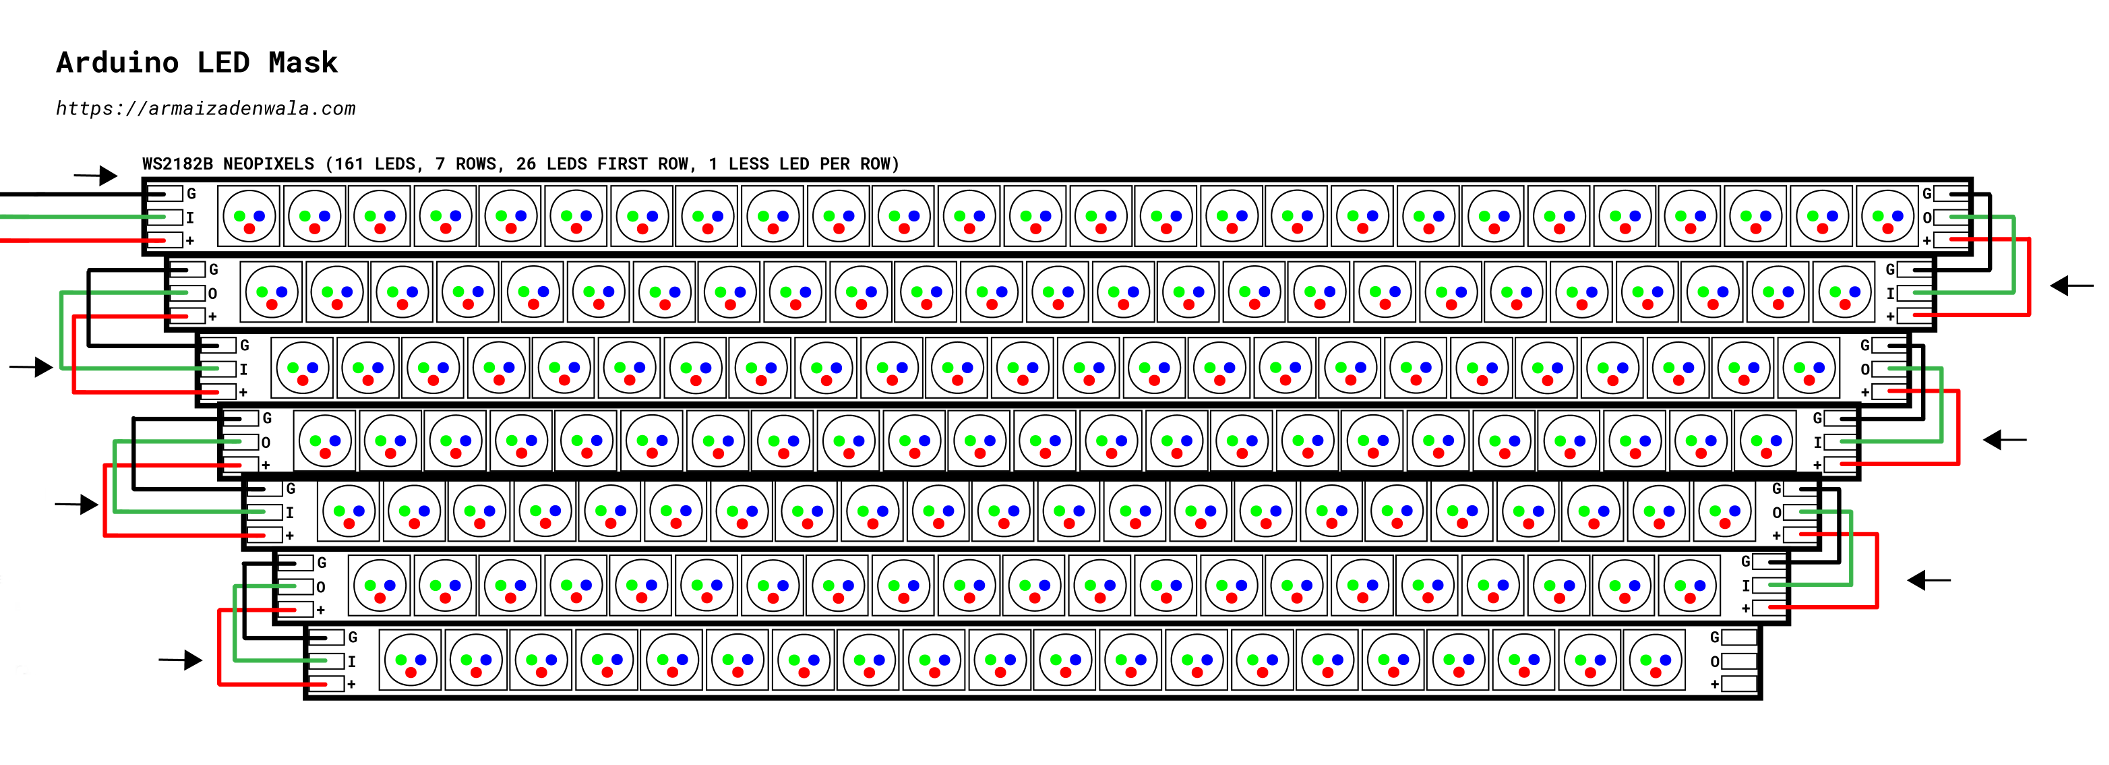
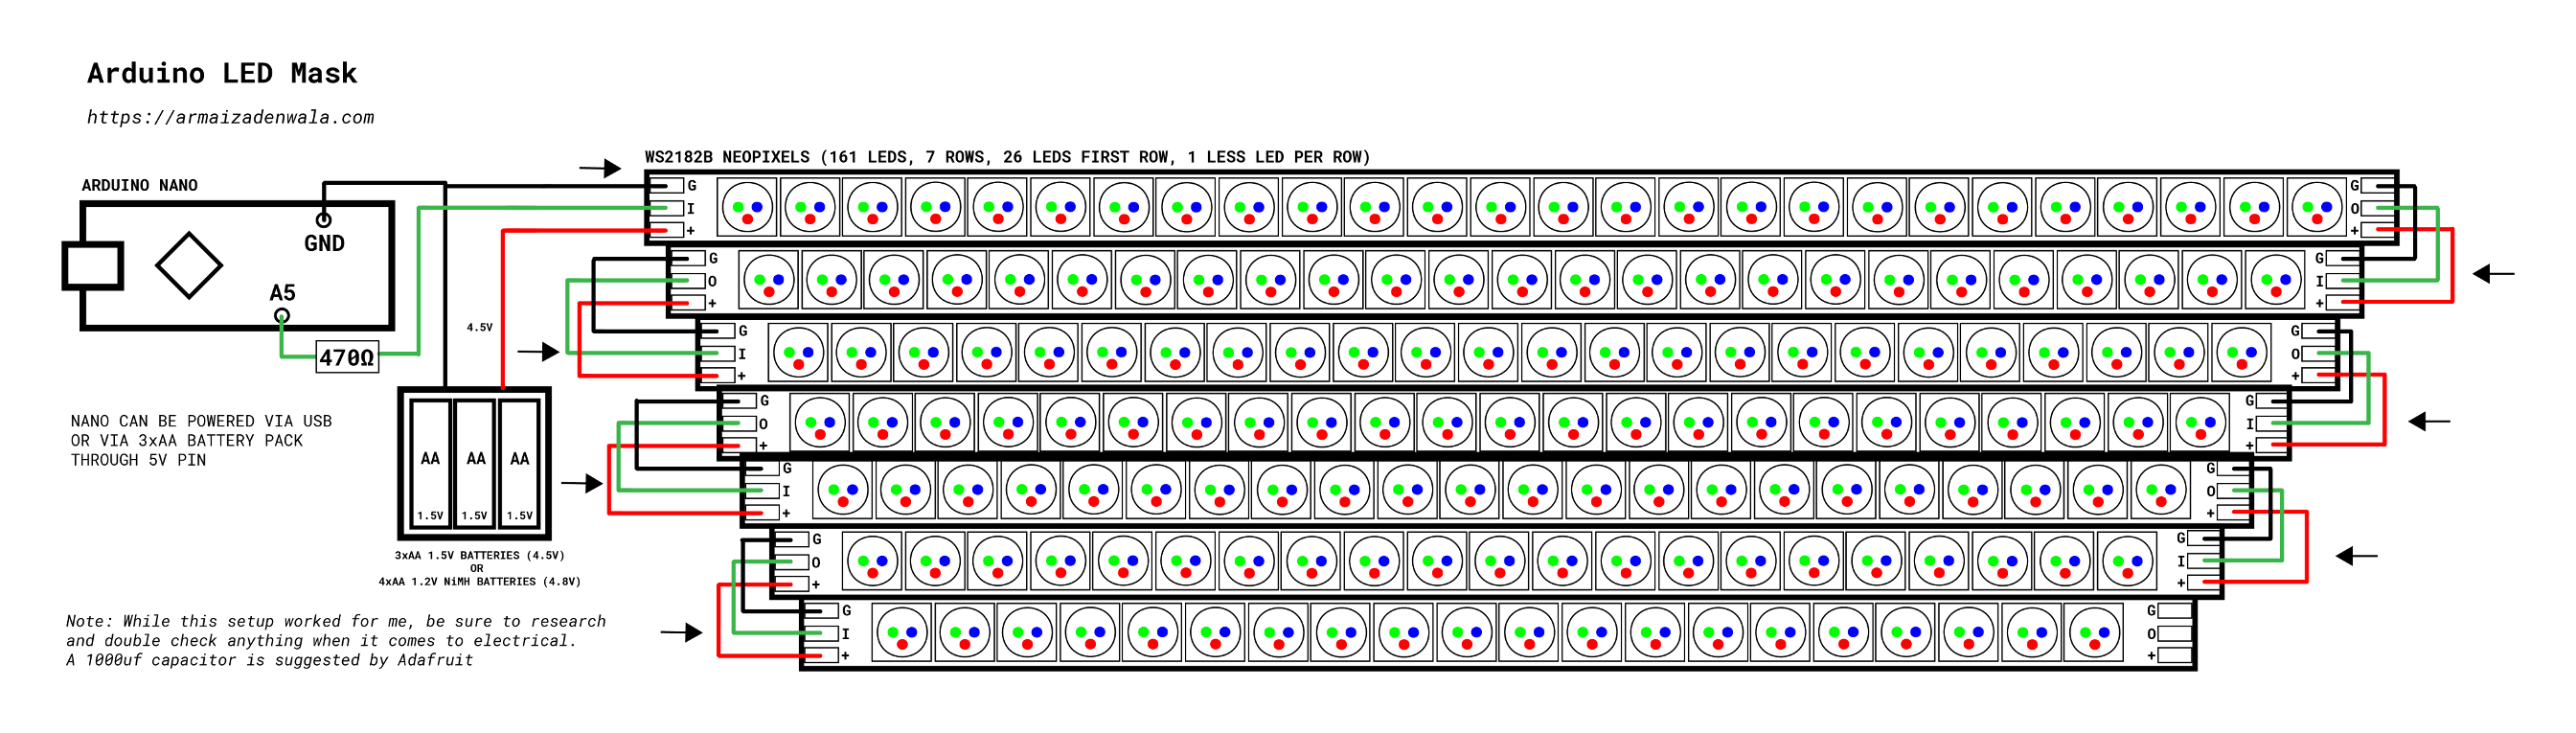
The mask itself consists of 7 rows of WS2182B 144 LEDs/m NeoPixels. There are a total of 161 LEDs, with the first row being 26. Each row decrements by 1, which means the 7th row will have 19 NeoPixels. Since we are decrementing by an odd number, we will line up the pixels to be in-between the two pixels above it. This results in a hexagon-like geometric pattern which will allow us to make awesome patterns for our visuals.
The order of WS2182B pins can differ depending on the brand. In my case, the order was Ground, Data, and Power. These are represented with G, I/O, + respectively. These LEDs are individually addressable so the order of these LEDs matter. When you get a Neopixel strip, it will be one long strip of 144 leds or so. You can cut these leds between these pins and solder them together as seen with the image above, making sure that the O pin connects to the I pin.
The problem is that the Arduino won't see this in the shape of a mask, it will still think of it as one long strip. As seen with the full-sized image, the LEDs snake around, having each alternating row flipped. You can tell the direction of the LEDs based on the I and O pins of one end of the LED strip. This is so that we do not have long wires going from one end of the mask to the other (I marked the flow of the LED strip's data pin using arrows). This means that the 26th LED is the last LED in the first row, 27th LED is the last LED of the 2nd row, 28th LED is the 2nd to last LED of the 2nd row, and the 51st LED is the first LED of the 2nd row.
Luckily, this isn't an issue if all of our designs are symmetrical, because the 27th LED and the 51st LEDs would be the same color. If our designs are not symmetrical, we would need a helper function to flip each row which could use more memory.
In order to keep the LEDs in place and wearable, I bought an airsoft mask and measured that the first row of 26 LEDs would fit. After that, I measured the maximum amount of rows I could fit while keeping the "decrement by 1" rule. In my case it was 7 rows. Once everything was measured, the LEDs were cut and soldered, ensuring each alternating row flipped. Then the back of the NeoPixels were taped together using electrical tape. I used a braided fishing line to sew the LEDs to the mask.
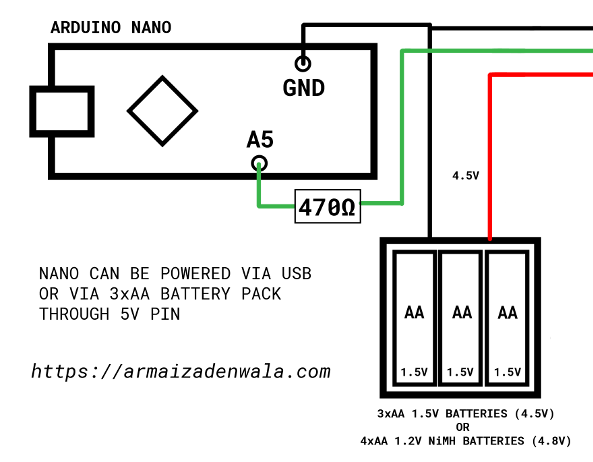
The Arduino is connected to the mask's data pin through th A5 pin. There is a 470ohm resistor prior to reaching the Arduino's pin. This will keep the signal clear to the NeoPixels. The mask is powered by a battery pack with 3 AA batteries. The ground cable is connected to the Arduino and the mask. The power cable of the battery is connected to the mask's + pin. You can also connect the power to the Arduino's 5V pin, however, we won't worry about that until we are finished programming it. The Arduino will be connected to our computer using a usb cable.
Alternatively, you could upgrade the battery pack from 4.5V to 4.8V by using 4 Rechargable NiMH batteries at 1.2V each. As long as you limit the power to the NeoPixels to be under 5V, you should be ok.
You can now connect your Arduino to your mask's G, I, + pins on the first row. Be sure that the length of these cables are long enough to place them in your pocket, or anywhere you plan on keeping them.
Open your Arduino IDE and create a new project. Install the FastLED library via the Library Manager window (Sketch > Include Library > Manage Libraries). Once that is installed, we can begin writing our app.
Note: You can edit the .ino file using your preferred editor like Vim or VSCode and solely use the IDE for uploading and compiling.
void setup() {
  // put your setup code here, to run once:

}

void loop() {
  // put your main code here, to run repeatedly:

}
Once you create the new sketch, you will be presented with a default template. We will need to import and setup the FastLED library:
#include <FastLED.h>

#define LED_PIN A5
#define NUM_LEDS 161
#define LED_TYPE WS2812B
#define BRIGHTNESS 20

CRGB leds[NUM_LEDS];

void setup()
{
  FastLED.addLeds<LED_TYPE, LED_PIN>(leds, NUM_LEDS);
  FastLED.setMaxPowerInVoltsAndMilliamps(4.5, 500);
  FastLED.show();
}

void loop()
{
}
#include <FastLED.h>: This imports our FastLED Library
#define LED_PIN A5: This tells FastLED that we are using the A5 pin for our LEDs
#define NUM_LEDS 161: The # of LEDs we have
#define LED_TYPE WS2812B: This is the type of LEDs we are using
#define BRIGHTNESS 20: This sets the brightness of our LEDs. NeoPixels are bright and use a lot of power. Having this higher means that we use more power but have a larger range of colors. Using a smaller number results in a much smaller ranger of colors.
CRGB leds[NUM_LEDS];: This defines our leds array which we will use to assign colors to specific LEDs. The CRGB object refers to an RGB pixel.
FastLED.addLeds<...>(...);: Sets up our LEDs for us and will instantiate the leds variable. It takes in the type of LEDs, pin, LEDs array, and number of LEDs as parameters.
FastLED.setMaxPowerInVoltsAndMilliamps(4.5, 500);: This uses a helper method that is provided by FastLED to automatically handle the power draw by passing in the volts of our power supply (4.5V)
FastLED.show();: Whenever we change the LEDs, the show method would need to be called to display the newly assigned LEDs.
Here comes the fun part: creating the visuals. The implementation I did was to create a 1d array with a length of NUM_LEDS and called it pattern. We will fill pattern with integers that indicate the color that will be assigned to an LED. In addition to the pattern array, there will be a 2d array for RGB colors that pattern would use to determine the color that needs to be outputted. We will call this colors. To save memory, we will share the colors array among all designs, so that colors can be reused without taking additional memory. We can achieve this by creating the 1d array patternColors that will bridge the pattern values to a color in colors. So if the value of the first item in patterns is 0, the 0th index of the patternsColorsarray could have a value of 2 which refers to the 2nd index of colors. In this scenario the 2nd index could have a value of {0, 100, 0}, which will show a green LED (RGB).
We want to animate the visuals, so we will wrap everything in a loop so that the colors rotate each iteration. Here is a visual for how the 0th and 1st iterations would look like for a mask with 6 leds:
The Arduino will parse through each value in the pattern array which in this case the current value is 1. So it finds the value of patternColors[1] and gets 0. It then gets the value of colors[0]
Now in the 2nd iteration, the value increments by 1 and is now 2. (When we program this, the array wont be mutated, we will instead calculate it using the modulus operator (%). (1 + 0) % 3 = 1, (1 + 1) % 3 = 2, and (1 + 2) % 3 = 0)
This allows us to animate our leds. We can take it a step further by nesting it another loop that would fade into the next "frame". Check out the before and after adding this effect in the video below. The effect without the fade goes outward, while the one with the fade goes inward. Notice how the inward effect looks drastically smoother:
If we follow this approach, we can create awesome looking visuals in minutes and have it automatically animate for us with very low memory usage. In fact, with 4 effects I was able to get my binary size for variables down to 1.1kb! This was drastically lower than just having 1 or 2 effects at 1.4kb.
For this guide, we will create a simple design that has a horizontal line that goes from the top of the mask to the bottom. First step is to create the 1d array that's formatted in the shape of our mask (place this in the loop method):
uint_least8_t linePattern[NUM_LEDS] = {
  0, 0, 0, 0, 0, 0, 0, 0, 0, 0, 0, 0, 0, 0, 0, 0, 0, 0, 0, 0, 0, 0, 0, 0, 0, 0,
   1, 1, 1, 1, 1, 1, 1, 1, 1, 1, 1, 1, 1, 1, 1, 1, 1, 1, 1, 1, 1, 1, 1, 1, 1,
    2, 2, 2, 2, 2, 2, 2, 2, 2, 2, 2, 2, 2, 2, 2, 2, 2, 2, 2, 2, 2, 2, 2, 2,
     3, 3, 3, 3, 3, 3, 3, 3, 3, 3, 3, 3, 3, 3, 3, 3, 3, 3, 3, 3, 3, 3, 3,
      4, 4, 4, 4, 4, 4, 4, 4, 4, 4, 4, 4, 4, 4, 4, 4, 4, 4, 4, 4, 4, 4,
       5, 5, 5, 5, 5, 5, 5, 5, 5, 5, 5, 5, 5, 5, 5, 5, 5, 5, 5, 5, 5,
        6, 6, 6, 6, 6, 6, 6, 6, 6, 6, 6, 6, 6, 6, 6, 6, 6, 6, 6, 6
};uint_least8_t: This sets out integers to be 8 bits, which is drastically smaller than a normal int. Since we aren't using large integers for this array, 8 bits is suffice.
linePattern[NUM_LEDS]: Sets our array to be the size of NUM_LEDS
0,..1,...2,...6: The 1d array is in the shape of our mask, with the first row being 26. Each row share a value that increments by 1 for every row. This means that the first row would be color 0 in the first "frame", and the last row would be color 6. The next frame would shift it so that the first row would be 1, and the last one would be 0.
Let's also define our pattern colors and call it lineColors:
uint_least8_t lineColors[7] = { 0, 0, 1, 1, 1, 1, 1 };These values don't mean much as we don't have colors defined, but this does tell us a horizontal line of 2 pixels wide will go from the bottom to the top of the mask (We want to reverse this in the future).
Our full file should now look like:
#include <FastLED.h>

#define LED_PIN A5
#define NUM_LEDS 161
#define LED_TYPE WS2812B
#define BRIGHTNESS 20

CRGB leds[NUM_LEDS];

void setup()
{
  FastLED.addLeds<LED_TYPE, LED_PIN>(leds, NUM_LEDS);
  FastLED.setMaxPowerInVoltsAndMilliamps(4.5, 500);
  FastLED.show();
}

void loop()
{
  uint_least8_t linePattern[NUM_LEDS] = {
    0, 0, 0, 0, 0, 0, 0, 0, 0, 0, 0, 0, 0, 0, 0, 0, 0, 0, 0, 0, 0, 0, 0, 0, 0, 0,
    1, 1, 1, 1, 1, 1, 1, 1, 1, 1, 1, 1, 1, 1, 1, 1, 1, 1, 1, 1, 1, 1, 1, 1, 1,
      2, 2, 2, 2, 2, 2, 2, 2, 2, 2, 2, 2, 2, 2, 2, 2, 2, 2, 2, 2, 2, 2, 2, 2,
      3, 3, 3, 3, 3, 3, 3, 3, 3, 3, 3, 3, 3, 3, 3, 3, 3, 3, 3, 3, 3, 3, 3,
        4, 4, 4, 4, 4, 4, 4, 4, 4, 4, 4, 4, 4, 4, 4, 4, 4, 4, 4, 4, 4, 4,
        5, 5, 5, 5, 5, 5, 5, 5, 5, 5, 5, 5, 5, 5, 5, 5, 5, 5, 5, 5, 5,
          6, 6, 6, 6, 6, 6, 6, 6, 6, 6, 6, 6, 6, 6, 6, 6, 6, 6, 6, 6
  };
  uint_least8_t lineColors[7] = { 0, 0, 1, 1, 1, 1, 1 };
}
We will now create a pattern method:
...

void loop()
{
  uint_least8_t linePattern[NUM_LEDS] = {
    ...
  };
  uint_least8_t lineColors[7] = { 0, 0, 1, 1, 1, 1, 1 };
  pattern(linePattern, lineColors, false, 1, 7);
}

void pattern(uint_least8_t pattern[NUM_LEDS], uint_least8_t colorsPattern[], bool reverse, float speed, uint_least8_t max) {
  uint_least8_t colors[2][3] = {
    {60, 35, 150},
    {0, 30, 170},
  };
}
pattern(linePattern, lineColors, false, 1, 7);: This calls our new pattern method and passes in our pattern and pattern colors. The parameters are explained below.
void pattern: We aren't returning anything so we are using void
uint_least8_t pattern[NUM_LEDS]: This is the pattern array we are passing in
colorsPattern[]: This is the pattern "bridge" colors that we are passing in
bool reverse: This is a flag to reverse the array so that we don't have to reverse the pattern array
float speed: This is the speed of the animations
uint_least8_t max:This is the max number of colors we have, if you increase it, you could increase the amount of colors used in an effect. For example, if we doubled the pattern colors array to include the 7 more colors and set the max to 14, the effect will loop twice, using the last 7 colors for the 2nd loop. Even better, it will automatically transition to the next colorset. You could create different effects using this method and save even more memory without creating a more complicated pattern array.
uint_least8_t colors[2][3] = {: This is the 2d array containing all of the colors from every effect.
We can now work on the pattern method, focused only on showing the LEDs in the 0th iteration, without worrying about animations or fading.
The FastLED library makes it very easy to set the color for an LED. If we want to set the first LED to red, we can do so via leds[0] = CRGB(100, 0, 0). However, it won't show until we call FastLED.show(). So lets loop through the pattern array and map the LEDs to the appropriate color:
void pattern(uint_least8_t pattern[NUM_LEDS], uint_least8_t patternColors[], bool reverse, float speed, uint_least8_t max) {
  uint_least8_t colors[2][3] = {
    {5, 160, 60},
    {0, 30, 170},
  };
  for (uint_least8_t i = 0; i < NUM_LEDS; i++) {
    uint_least8_t color = pattern[i];
    leds[i] = CRGB(
      colors[patternColors[color]][0],
      colors[patternColors[color]][1],
      colors[patternColors[color]][2]
    );
  }
  FastLED.show();
  FastLED.delay(100);
}
for (uint_least8_t i = 0; i < NUM_LEDS; i++) {: This create a for loop that loops from 0 to our total leds.
uint_least8_t color = pattern[i];: This gets us the pattern color index from pattern
leds[i] = CRGB(: Assigns the color to the led at index i
colors[patternColors[color]][0]: This grabs the color from the colors array using the color variable and grabs the 0th index to represent the R in RGB. It does the same for G and B.
FastLED.show();: Displays the LEDs after all of the LEDs are set, so that they show all at once rather than one at a time.
FastLED.delay(100);: Delays each render by 100ms, this can be adjusted to cause a larger delay. This helps keep our animations at a consistent speed.
This will result in the mask looking like this:
To animate the design, we would need to wrap our method in a for loop and change the color value by 1 on every increment. We will use the modulus operator (%) to loop any value above max back to zero.
void pattern(uint_least8_t pattern[NUM_LEDS], uint_least8_t patternColors[], bool reverse, float speed, uint_least8_t max) {
  uint_least8_t colors[2][3] = {
    {5, 160, 60},
    {0, 30, 170},
  };
  for (uint_least8_t x = 0; x < max; x++) {
    for (uint_least8_t i = 0; i < NUM_LEDS; i++) {
      uint_least8_t color = (pattern[i] + x) % max;
      leds[i] = CRGB(
        colors[patternColors[color]][0],
        colors[patternColors[color]][1],
        colors[patternColors[color]][2]
      );
    }
    FastLED.show();
    FastLED.delay(100);
  }
}
for (uint_least8_t x = 0; x < max; x++): Loops through our original pattern method max times.
(pattern[i] + x) % max;: Each iteration will increment the original pattern value by 1. If it overflows past max, it will loop back to 0 because of the modulus operator. Remember that max can be anything, as long as there are enough colors.
Be sure that FastLED.show() is within the for loop or it wont render each iteration! That is all it takes to animate it. Now we will need to fade to the next iteration to keep it clean and we are done!
Lets take a look at a helper method called getColorFade that I created for this project:
float getColorFade(uint_least8_t a, uint_least8_t b, uint_least8_t index, uint_least8_t range) {
  if (a == b)
  {
    return a;
  }
  float dif = abs(a - b);
  float change = (float)dif / range;
  change *= (index + 1);
  if (a > b)
  {
    return a - change;
  }
  return a + change;
}
float getColorFade: This method returns a float that is supposed to represent a color. We use float so that it won't round whole numbers, to keep the fades clean.
uint_least8_t a: This is color a, this would be the source color
uint_least8_t b: This is color b, this would be the destination color
uint_least8_t index: This is the current stage the fade is on. So if it is 2 loops in, this would equal to 2 on the 3rd loop (starts at 0). This is explained in the next parameter.
uint_least8_t range: This is the amount of steps we want the fade to occur. So if we want it to fade over 4 iterations, after 1 iteration it would be 25% of the way from color a to color b. So lets say that we want it to fade over 10 iterations. index will be equal to 0, going all the way until 9. When index is 5, that means it is half way towards color b.
if (a == b): If the colors are the same, return the color.
float dif = abs(a - b);: Get the difference of the two colors. abs is used so that we don't have any negative values. We just want to know the "distance" between the two.
float change = dif / range: This is amount we need to add/subtract to a. Lets pretend a = 150, and b = 50. The difference between the two is 100. We want to fade to the next color over 5 increments. So in this case the change would be 20 (100 / 5) a.k.a dif / range.
change *= (index + 1);: The change is then multipled by the current index otherwise it won't actually fade. (first loop adds 20, second loop adds 40, etc.)
if (a > b): This decides whether we need to add change to a or subtract it. (ex. a is 100, b is 50, so we subtract from a to get closer to b's value)
Now for the final loop! Update your pattern method:
void pattern(uint_least8_t pattern[NUM_LEDS], uint_least8_t patternColors[], bool reverse, float speed, uint_least8_t max) {
  uint_least8_t colors[2][3] = {
    {5, 160, 60},
    {0, 30, 170},
  };
  for (uint_least8_t x = 0; x < max; x++) {
    for (uint_least8_t z = 0; z < (4 * speed); z++) {
      for (uint_least8_t i = 0; i < NUM_LEDS; i++) {
        uint_least8_t colorA;
        uint_least8_t colorB;
        if (reverse) {
          colorB = (pattern[i] + (4 - x)) % max;
          colorA = (colorB + 1) % max;
        } else {
          colorA = (pattern[i] + x) % max;
          colorB = (colorA + 1) % max;
        }
        leds[i] = CRGB(
          getColorFade(colors[patternColors[colorA]][0], colors[patternColors[colorB]][0], z, (4 * speed)),
          getColorFade(colors[patternColors[colorA]][1], colors[patternColors[colorB]][1], z, (4 * speed)),
          getColorFade(colors[patternColors[colorA]][2], colors[patternColors[colorB]][2], z, (4 * speed))
        );
      }
      FastLED.show();
      FastLED.delay(50);
    }
  }
}
for (uint_least8_t z = 0; z < (4 * speed); z++): We implement the fade loop on every color change loop. This is because when we want it to fade to the next color first, then change the color so that it can fade to the next one again. From my tests, 4 is enough steps to fade to the next color, so I use z < (4 * speed) in the for loop. The speed parameter exists for us to adjust the speed of the fades. Right now our pattern call in loop() uses a speed of 1.5 so that means this would fade over 6 iterations. The z variable is our index for our fade method.
uint_least8_t colorA;: We create the colorA and colorB variable here so that we can instantiate them depending on if we want the effects reversed or not.
if (reverse): The code nested within this if statment is the exact same as the else statement, just that the variable names are reversed. This results in the animations to go in the reverse direction.
colorA = (pattern[i] + x) % max;: This is the color variable we had before.
colorB = (colorA + 1) % max: This gets the next color before the x for loop increments to it. So if colorA is 0, this will return 1.
getColorFade(...): We call our new fade method and pass in all of the appropriate parameters. This has to be done for each color.
patternColors[colorA]][0]: This gets the value of colorA so that our fade method can calculate how much to increment and return. The same applies to colors[patternColors[colorB]][0].
(4 * speed): We need to multiply our default 4 by speed since we can't have the fade for loop fade 6 times and the color fade method expecting 4.
FastLED.delay(50);: The fade method will slow down the animation since this delay will be called more times before shifting to the next color. I usually like keeping this delay low, but that results in more calls to the mask.
That's it! Now your code should look like this:
#include <FastLED.h>

#define LED_PIN A5
#define NUM_LEDS 161
#define LED_TYPE WS2812B
#define BRIGHTNESS 20

CRGB leds[NUM_LEDS];

void setup()
{
  FastLED.addLeds<LED_TYPE, LED_PIN>(leds, NUM_LEDS);
  FastLED.setMaxPowerInVoltsAndMilliamps(4.5, 500);
  FastLED.show();
}

void loop()
{
  uint_least8_t linePattern[NUM_LEDS] = {
    0, 0, 0, 0, 0, 0, 0, 0, 0, 0, 0, 0, 0, 0, 0, 0, 0, 0, 0, 0, 0, 0, 0, 0, 0, 0,
    1, 1, 1, 1, 1, 1, 1, 1, 1, 1, 1, 1, 1, 1, 1, 1, 1, 1, 1, 1, 1, 1, 1, 1, 1,
      2, 2, 2, 2, 2, 2, 2, 2, 2, 2, 2, 2, 2, 2, 2, 2, 2, 2, 2, 2, 2, 2, 2, 2,
      3, 3, 3, 3, 3, 3, 3, 3, 3, 3, 3, 3, 3, 3, 3, 3, 3, 3, 3, 3, 3, 3, 3,
        4, 4, 4, 4, 4, 4, 4, 4, 4, 4, 4, 4, 4, 4, 4, 4, 4, 4, 4, 4, 4, 4,
        5, 5, 5, 5, 5, 5, 5, 5, 5, 5, 5, 5, 5, 5, 5, 5, 5, 5, 5, 5, 5,
          6, 6, 6, 6, 6, 6, 6, 6, 6, 6, 6, 6, 6, 6, 6, 6, 6, 6, 6, 6
  };
  uint_least8_t lineColors[7] = { 0, 0, 1, 1, 1, 1, 1 };
  pattern(linePattern, lineColors, false, 1, 5);
}

void pattern(uint_least8_t pattern[NUM_LEDS], uint_least8_t patternColors[], bool reverse, float speed, uint_least8_t max) {
  uint_least8_t colors[2][3] = {
    {5, 160, 60},
    {0, 30, 170},
  };
  for (uint_least8_t x = 0; x < max; x++) {
    for (uint_least8_t z = 0; z < (4 * speed); z++) {
      for (uint_least8_t i = 0; i < NUM_LEDS; i++) {
        uint_least8_t color = (pattern[i] + x) % max;
        uint_least8_t colorA;
        uint_least8_t colorB;
        if (reverse) {
          colorB = (pattern[i] + (4 - x)) % max;
          colorA = (colorB + 1) % max;
        } else {
          colorA = (pattern[i] + x) % max;
          colorB = (colorA + 1) % max;
        }
        leds[i] = CRGB(
          getColorFade(colors[patternColors[colorA]][0], colors[patternColors[colorB]][0], z, (4 * speed)),
          getColorFade(colors[patternColors[colorA]][1], colors[patternColors[colorB]][1], z, (4 * speed)),
          getColorFade(colors[patternColors[colorA]][2], colors[patternColors[colorB]][2], z, (4 * speed))
        );
      }
      FastLED.show();
      FastLED.delay(50);
    }
  }
}

float getColorFade(uint_least8_t a, uint_least8_t b, uint_least8_t index, uint_least8_t range) {
  if (a == b)
  {
    return a;
  }
  float dif = abs(a - b);
  float change = dif / range;
  change *= (index + 1);
  if (a > b)
  {
    return a - change;
  }
  return a + change;
}
You can now create some designs by creating more pattern arrays and pattern colors. In my experience, each design only takes 1-5 minutes. As long as you remember where the center index is, you can make a symmetrical design fairly fast. Note: Using the multicursor feature in your editor helps a TON
I have lots of upgrades planned so stay tuned!